THE SEUCK VAULT
Main | Menus | Archive | Tips | Links | Contact
THE SECRET OF SEUCKCESS - PART ONE
By Andrew Smith
This article first appeared in Commodore Format issue 30.
Writing games with Shoot 'Em-Up Construction Kit is a doddle. Well, yes and no. SEUCK (as it's known to its friends) does do all the hard work for you - all the number crunching and routines-stuff - so it's easy enough to write a game that works. Writing one that is fun to play is another matter altogether, and requires a lot of thought and creative input. While most of that has to come from you, there are some general rules to follow if you want to make your game as playable as possible. Wanna know what they are? Then you're in the right place.
The first thing to do is to decide on a scenario. Not all shoot-'em-ups have to be set in space, so be more original, let your imagination go wild. One of the most memorable SEUCK games the CF crew has seen was called Spoony Lad which featured pitched battles between various bits of cutlery - pretty daft, but it caught our attention. Why not try a Wild West shoot-'em-up or one set inside the human body, with white cells battling viruses. If you do want to set your game in space, try to think up a new twist.
When you've decided on a scenario note down your ideas. Think of a brief plot, something simple that will get the ideas flowing as you write your game. Don't write a complicated plot; leave that until you are creating the game. Writing a brief storyline helps you decide how the scenery and aliens should look. This is important because you don't want a mish-mash of sprites - that'll just look a mess.
Load up your copy of SEUCK, go into the sprite editor and have a go at drawing the player's sprite. Do a few and choose which looks best. Draw your first ship in sprite number 0, your next effort in number one and so on.
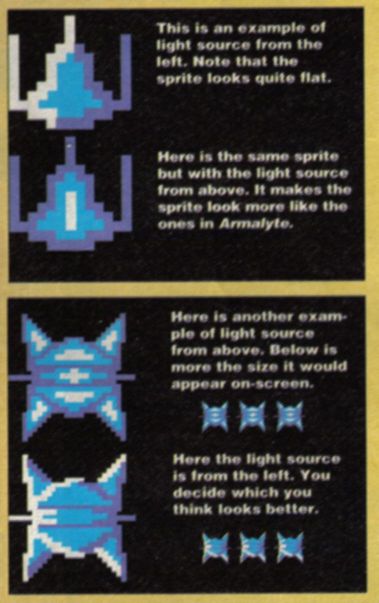
Take note of the colours you're using; you're limited to three colours plus the background colour. Don't draw your ship in a solid block of colour because that tends to make it look flat and two-dimensional. Use a white to suggest that light is shining on the sprite and a dark grey to indicate shade. If you want to use this style shading for the enemy sprites as well don't change the colours you use for the light and shade. You can only change the third colour, so alter that if you want the enemies to be a different colour (which is a good idea).
The best method for suggesting a 3D sprite is to use what's called light sourcing. Imagine there's a lightbulb somewhere around your sprite; use your lighter colour on the parts of the sprite where the light would fall (yes, if the bulb was on, pedant). On the opposite side of the sprite use your shading colour.
This is one of the hardest parts of writing a game. You're limited to a few colours, which makes it difficult to draw decent scenery. The best colours to use for shading and light are brown and white respectively (the technique I used in Aquablasta). This leaves you with just the first eight colours the C64 has to offer which does cause problems. Try to avoid the colours red and dark blue because they clash with the brown and look awful. Now you're down to six colours - not a lot really.
Start off your scenery simple then gradually add detail; it's much easier this way. The best advice here is feel free to experiment.
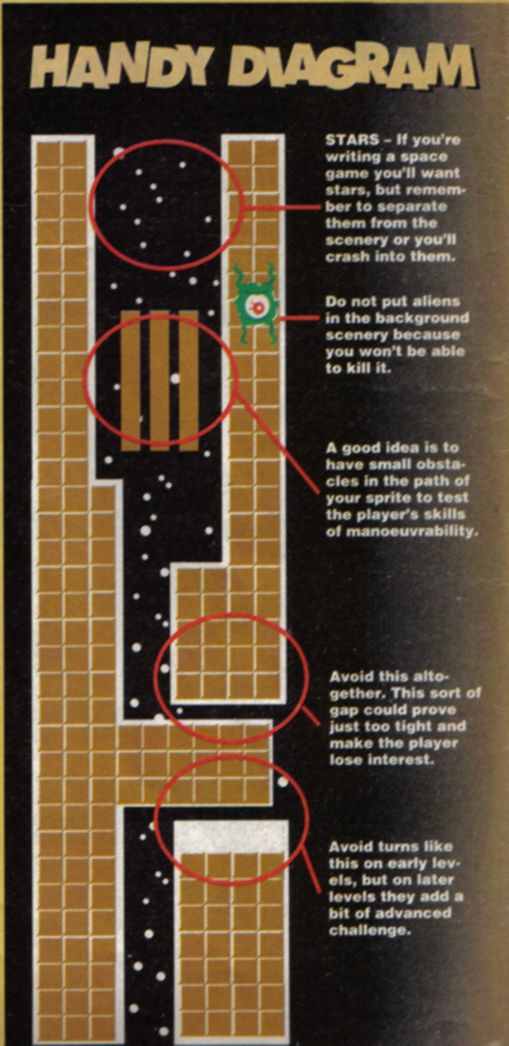
This is a part of SEUCK that allows you to take the blocks you drew in the background editor and paste them onto the screen forming a map through which your sprite has to navigate. This is where the game starts to take shape, so spend a lot of time making the graphics look good. A word of warning - don't make your map too complicated. Nothing will put someone off playing your game as much as the Game Over message popping up every few seconds.
Also it can be very easy to get carried away with pasting blocks everywhere and without realising it join up both sides of the screen with scenery. This means that the player won't be able to get past, he'll get annoyed and very probably won't want to play again (which is fair enough). There are a few hints about what works in our handy diagram (the one called "Handy Diagram") but again, experiment to see what works best.
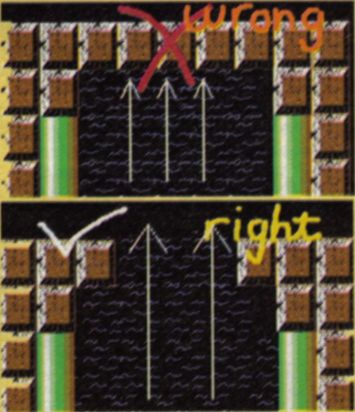
Make sure you don't get carried away and block the route up the scenery.
This is quite hard to do well and needs a bit of practice. Say, for example, you wanted to rotate an enemy sprite along its y-axis. What you do is draw the un-rotated sprite then copy it into the next sprite area. Alter the copied sprite a tad, just enough to see that it has actually moved. When you've finished that frame of the animation copy it into the next area and alter it slightly again. Continue doing this until the sprite is fully rotated. If you can do that then you are well on your way to creating decent animations. What you have to remember is to keep all the sprites you used in the animation the same colours.
This is the most exciting part of creating your game because when you've dotted a few enemies around your map you can test the game out by blowing up your creations. Don't be tempted to put too many enemies on-screen at once; not only does it make the game more difficult, but also slows it down and makes the sprites flicker.
The best way to add challenge to the game is to make each individual enemy more deadly by, for example, making the enemy bullets faster or making an alien fire in all directions.
As you put the enemies into the game, invite a mate or two around to test the game so far and to discover their opinion on whether it's too hard. Trust me, your game will be much better with a little help from your friends (the Beatles once sang a song about it, and the home computer hadn't even been invented then, they were that clever).
Massive guardians, we've all seen 'em. It's a tried and trusted formula - large, Steven Seagal-like (erm, I think he means hard to kill - Ed) aliens at the end of every level. Guardians are traditionally made up from several sprites so it's best to draw them on paper before trying to create them on the computer. Because of the size of the guardians it is best to use simple onscreen movements as it saves memory. Don't under any circumstances have your guardian zipping about the whole screen at warp factor nine - this wastes a lot of memory.
Another 'tradition' with guardians is that they take multiple shots to kill, so make sure that all the sprites that make up your guardian need the same amount of shots to be killed. This sort of detail can be edited using the Edit Enemy Bits option. Also try not to have all the sprites firing bullets - it'll slow the game down a lot, lead to flickering and make the guardian next to impossible to kill (that'll be Steve Seagal's next film, then? - Ed).
This is where the player's attributes are set, including the speed at which it travels, the number of bullets it can fire, the area onscreen it can move through, etc. If, while you're testing the game, you feel your sprite moves too slowly you can speed it up using the player limitations. You don't want it to move too fast, though, or else it'll be too hard to control.
The amount and speed of bullets that the player can fire is also set here. When I write games I have three bullets onscreen at once and have the bullets move at maximum speed. This ensures the game will not slow down too much, by moving the bullets off screen as soon as possible.
There are no set rules for sound effects, but here are a few tips. If you're using lots of different types of enemy onscreen, use a different effect for each. Saw sound waves give a crashing sound, while sine sound waves create what is known in the trade as "bleeps". So you could use sine sound waves for an explosion caused by the player, and saw sound waves for when the enemy scores a hit. A combination of bleeps for firing bullets and crashes for hits works well.
The guardians should have a menacing sound, so use the sine waves at a low pitch and make their explosions loud and long. Listen to Turrican 2 or Armalyte - they'll give you loads of inspiration.
This basically means your title screen. Make it as attractive as possible, as it will influence people to play the game. If you want, use the colour cycling techniques for your title screen. Oh, and don't forget the author's name - you.
When you've finished your game it has to be play-tested extensively. A difficulty curve has to be taken into consideration, i.e., the game should get gradually harder as you play. You don't want a very easy first level then an extremely difficult second one, so get as much play-testing in as possible. If you have had constructive criticism all the way through your game's development, then your game has the potential to be quite a corker.
DO make the first levels relatively easy, to make the game instantly playable. After each level increase the difficulty to keep the game fresh.
DO spend a lot of time on the graphics. Decent graphics will make the player more likely to want to see the rest of the game.
DON'T make the map too complicated or it'll be impossible to navigate through.
DON'T place enemies in the scenery because it makes them invulnerable.
DON'T have too many sprites onscreen at once as they slow the game down.
DO sprinkle obstacles in the path of the player. It adds variety to the game.
DO try to keep colour clashes to a minimum - not only do they look ugly, but also they make it difficult to see what's going on. Particularly avoid red against brown.
DO use a variety of sound effects - different ones for each enemy.
DO include end-of-level guardians in the game. They allow the player to rest their trigger finger while the scrolling comes to a standstill, add variety and challenge, and let you show off your sprite-drawing abilities.
DO make backups of your game regularly. Accidents will happen!
DO get mates to playtest the game as it develops.
DO beee dooo beee dooo dum dum.
- Shoot-'Em-Up Construction Kit was re-released by GBH at budget price, £5.99 disk and £4.99 cassette
- Daedalus by Andrew Smith was on Commodore Format Power Pack 30
- Aquablasta by Andrew Smith was on Commodore Format Power Pack 19